⌘ K

Search

Search portal content

AI customer support in one tabAI customer support in one tab
⌘ K

Search

Search portal content

AI customer support in one tabAI customer support in one tab
  • Create an inbox
  • Choose inbox channels
  • Forward your support address
  • Forward from Google Workspace
  • Forward from Gmail
  • Forward from Microsoft 365
  • Send from your own domain
  • Sender names and signatures
  • Fix email problems
  • Connect WhatsApp
  • Use WhatsApp templates
  • Connect Telegram
  • Set up auto-reply
  • Choose ticket numbering
  1. Home
  2. Inboxes & channels

Send from your own domain

Make replies come from support@yourcompany.com instead of an initdesk address. Verify your domain, forward your address, run the check, turn it on.

Send from your own domain

Make replies come from support@yourcompany.com instead of an initdesk address. Verify your domain, forward your address, run the check, turn it on.

By default, replies from initdesk come from an initdesk address. Set up a company email address and new tickets in an inbox send replies from your own address, such as support@yourcompany.com. The setup is called Company email address. It has 2 parts: verify your domain once for your organization, then set up the address for each inbox.

This changes email about customer tickets only. Team invitations, sign-in codes, and billing emails keep their current sender.

Before you start

  • You need the account owner or admin role. Other roles don't see these settings.
  • You need access to your domain's DNS settings, or someone who can add records for you.
  • You need your support address to receive mail and be able to forward it. See Forward your support address.

This is separate from the custom domain for your help center, which changes the web address of the help center.

Verify your domain

You do this once for each domain, and every inbox on that domain can use it.

  1. Go to Settings > Sending domains.
  2. Select Add domain.
  3. Enter the domain that comes after the @ in your support address, such as yourcompany.com. Don't include http://, https://, or www..
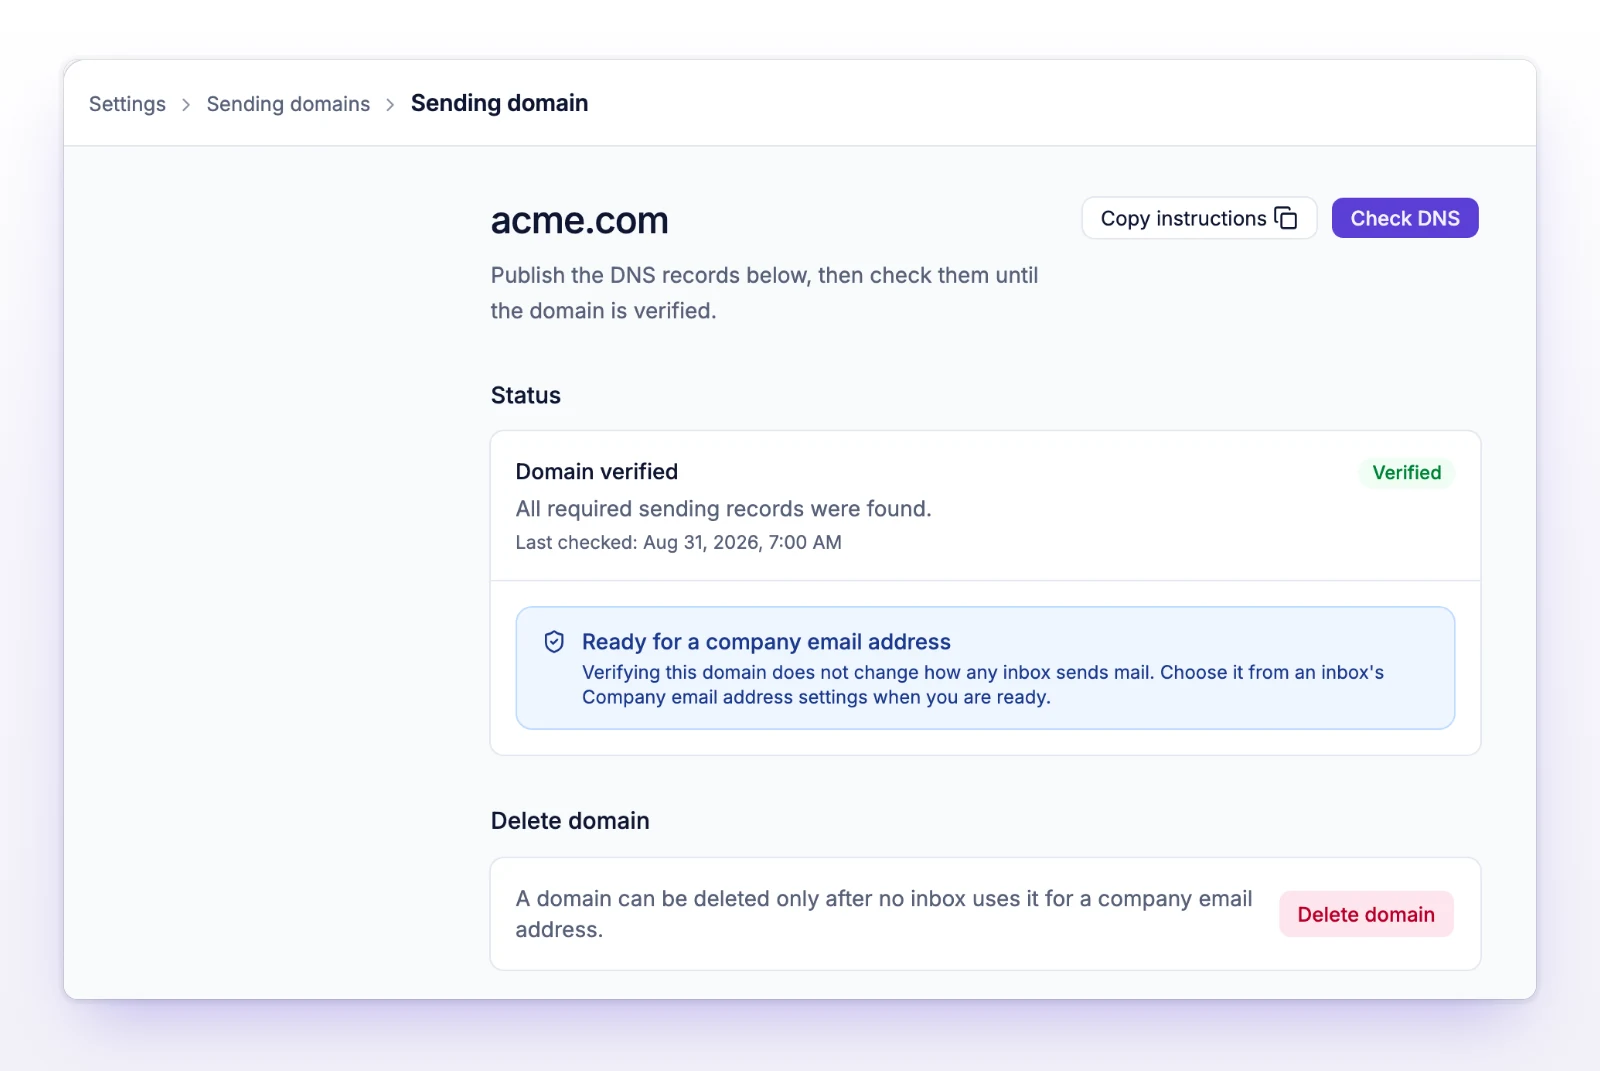
  4. Select Add domain. initdesk opens the DNS records for it.
  5. At your DNS provider, add every record. Copy each Name and Value exactly. To hand the list to someone else, select Copy instructions.
  6. Select Check DNS.
A verified sending domain page with its status and the Check DNS button
When every record is found, the domain shows as verified.

The records come in 3 groups. Here is what each one does:

Group What it does
Authenticate sending 3 DKIM records. DKIM is a signature on each email that proves it really came from your domain.
Handle bounces Records on a subdomain that handle bounced mail. They include SPF, a list of the servers allowed to send for a domain. It sits on that subdomain, so you don't edit your main SPF record.
Protect the domain A DMARC record. DMARC tells receiving servers what to do with mail that fails the other checks. It's marked Recommended and doesn't block verification.

Some DNS providers add your domain to the end of a name for you. If a provider doesn't accept a name, try it without the final .yourcompany.com. If your domain already has a DMARC record, keep it. Any DMARC policy counts as found.

Each record shows Found, Missing, or Mismatch, and the page shows how many required records were found. DNS changes can take time to spread. While the domain is Pending, initdesk checks again about every 45 seconds as long as the page stays open. The domain is ready when you see Domain verified.

Verifying a domain doesn't change how any inbox sends mail.

Set up the address for an inbox

  1. Go to Settings > Inboxes and open the inbox.
  2. Open Email.
  3. In the Company email address card, select Use company address. If setup already started, the button says Continue setup, Review and turn on, Fix issue, or Manage.

The setup page has 4 steps.

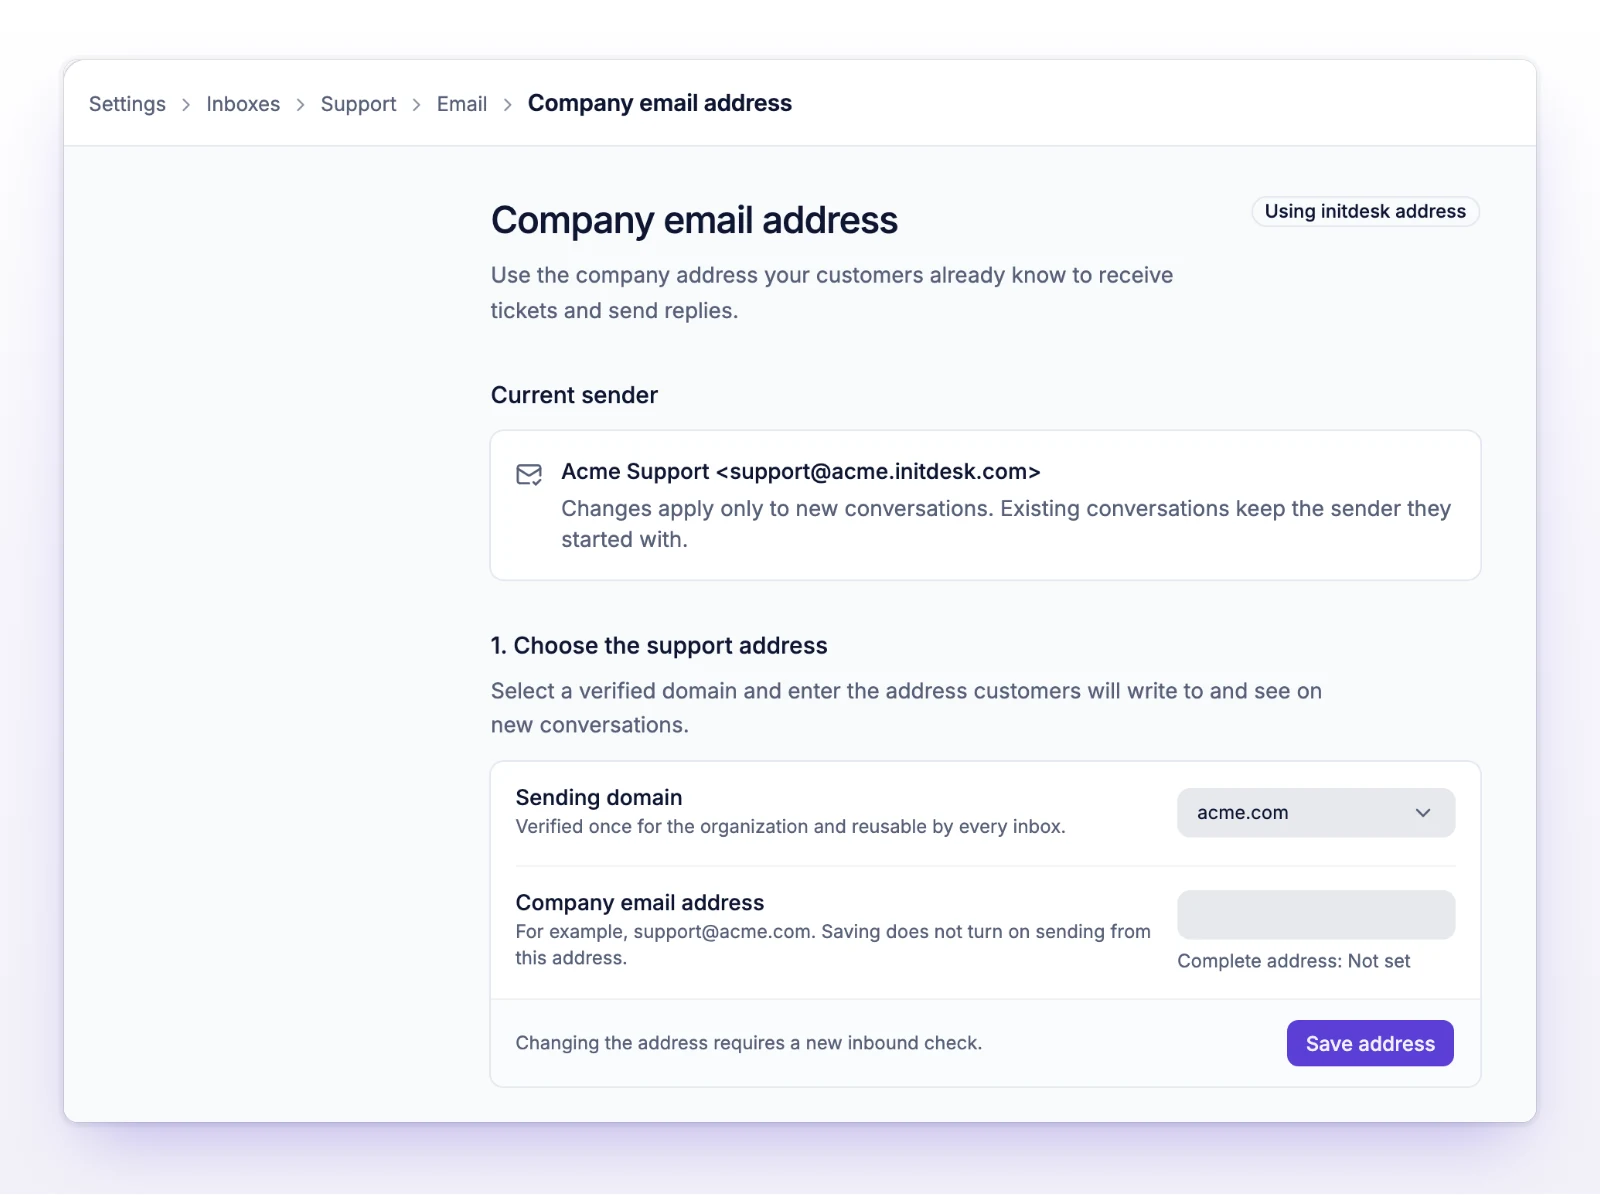
The Company email address page showing the current sender and the first step, Choose the support address
Start by choosing a verified sending domain and the address customers write to.

Step 1: Choose the support address

  1. Choose your verified domain under Sending domain. If you see No verified domain is ready, select Open sending domains and finish the section above. Continue company email setup brings you back here.
  2. Enter the complete address, such as support@yourcompany.com. It must be on the selected domain, or one of its subdomains.
  3. Select Save address.

Saving doesn't turn on sending.

Step 2: Forward incoming email

The page shows which address to forward to which. Create a forwarding rule at your email provider that sends your company address to the initdesk inbox address. Use Copy company address and Copy forwarding target to copy the two values. Keep the original sender and message headers intact.

Provider steps are in Forward from Google Workspace, Forward from Gmail, and Forward from Microsoft 365. If you already forward this address to the same inbox, the existing rule is enough. Keep one method so a message isn't forwarded twice.

Step 3: Check the forward

  1. Select Send inbound check.
  2. initdesk sends a real check message to your company address. Your forwarding rule must deliver it back to this inbox. It doesn't create a customer ticket.
  3. Wait. The page shows Waiting for the check and a countdown, and you can't send another check until it ends.
  4. When the page shows Inbound connected, the step is done.

If the check fails, the page explains why. See Fix email problems, then select Send again.

Step 4: Turn it on

When the status says Ready to turn on, select Turn on for sending. The page then shows Company email address is live, and Current sender shows the address replies will use.

This applies to new tickets only. Existing tickets keep the sender they started with.

How it behaves

Status on the Email page What it means
Using initdesk address No company address yet. Replies come from an initdesk address.
Setup in progress You saved an address, but the domain or forwarding check isn't finished.
Ready to turn on The address and the forwarding check are complete.
Live New tickets send from your company address.
Needs attention Something broke. Select Fix issue.
  • If your domain loses verification (for example, someone deletes a DNS record), new tickets use the initdesk sender until the records are back. Existing tickets keep their sender while the domain stays verified.
  • If you change the Address prefix of the initdesk inbox address, you need to update your forwarding rule and run a new check. Until you do, new tickets use the initdesk sender.
  • To stop, select Stop using for sending or Remove company email address. New tickets go back to the initdesk sender. Neither one removes your forwarding rule.
  • You can't delete a sending domain while an inbox uses it, or delete an inbox that still has a company email address. The warning names the inboxes. Deleting a domain doesn't remove its DNS records at your provider.
  • Only account owners and admins can do any of this.

Test a new ticket

  1. From an email account outside your company, send a new message to your support address.
  2. Check that it appears as a ticket in the right inbox.
  3. Reply from initdesk.
  4. Open the reply in the outside account. The sender should be your company address.
  5. Reply from the outside account. The reply should land in the same ticket.

Start with a new message. Replying to an older conversation shows the older sender.

If something's not working

If you can't turn on sending

You'll see "Complete the sending-domain and inbound checks before enabling." Verify the domain, save the address, and get Inbound connected. The button appears when everything is ready.

If the domain won't verify

See Fix email problems.

If replies still come from an initdesk address

Check that the status is Live, that you're testing a new ticket, and that the ticket is in the inbox you set up.

Related

  • Forward your support address
  • Fix email problems
  • Sender names and signatures
  • Use a custom domain
Forward from Microsoft 365

Send mail from Outlook or Microsoft 365 to initdesk with a redirect rule or forwarding, and allow external forwarding if Microsoft blocks it.

Sender names and signatures

Choose the name customers see on replies, set a signature for each inbox, and let each person on your team add a personal email signature.

Powered by initdesk
On this page
  • Send from your own domain
  • Before you start
  • Verify your domain
  • Set up the address for an inbox
  • Step 1: Choose the support address
  • Step 2: Forward incoming email
  • Step 3: Check the forward
  • Step 4: Turn it on
  • How it behaves
  • Test a new ticket
  • If something's not working
  • If you can't turn on sending
  • If the domain won't verify
  • If replies still come from an initdesk address
  • Related